Ultimate Guide To Hiking The Narrows in Zion National Park
DISCLOSURE: This post may contain affiliate links. If you purchase after clicking one of my links, I may earn a small commission at no extra cost to you. As an Amazon Associate, I earn from qualifying purchases. For more information, see my disclaimer.
If you’re planning to hike The Narrows in Zion National Park, one of the most popular and breathtaking hikes in Utah, you’re in the right place. The Narrows follows the Virgin River through narrow sandstone canyon walls and feels unlike any other trail in the park. While I explored other parts of Zion, hiking The Narrows was the main highlight of my trip. In this guide, I’ll cover everything you need to know to hike The Narrows, including best timing, gear, safety tips, and different ways to experience the hike, from doing it independently to joining a private guided Narrows tour if you’d rather have a local expert handle the logistics.
- What is The Narrows Hike in Zion?
- When is the best time to hike The Narrows?
- Tips for Hiking The Narrows: Gear, Safety, and Best Practices
- What You Need to Hike The Narrows + Gear Rentals in Zion
- Zion Narrows Rentals: Shoes, Neoprene Socks & Gear
- The Narrows Hiking Options
- The Bottom-Up Hike of The Narrows (no permit required!)
- Best Guided Narrows Tours in Zion National Park
- FAQ about Hiking the Narrows in Zion
- Final Thoughts on Hiking The Narrows in Zion
Save 50% on AllTrails Plus
Download offline maps, explore with 3D trail previews, receive wrong turn alerts, use Live Share, discover more with Parks & Areas, and seamlessly sync with your COROS watch.
Get AllTrails Plus for 50% Off →What is The Narrows Hike in Zion?
The Narrows hike is one of the most famous and popular hikes in Zion National Park, Utah. Specifically, this unique trail takes you through the narrowest section of Zion Canyon, where the Virgin River becomes your trail after the first mile. Along the way, you will hike surrounded by towering canyon walls that rise thousands of feet above you, offering an unforgettable and immersive wilderness experience.
For those who use a wheelchair or prefer an easier walk, the Riverside Walk is a paved, accessible trail that covers the first mile of the Narrows hike. From this Riverside Walk trail, you can still enjoy stunning views of the Virgin River and the towering canyon walls without getting wet.
When is the best time to hike The Narrows?
Timing your hike is crucial for a successful and safe Narrows experience. The best time to hike The Narrows in Zion National Park is during the late spring, summer, and early fall months, when water levels are lower and temperatures are warmer.
Winter and early spring can be challenging due to cold weather and high water levels, often causing the Narrows trail to close for safety reasons. Flash floods are also a serious risk any time of year, so always check the latest weather forecasts and Zion National Park alerts before your hike.
Water temperature in The Narrows varies seasonally, so prepare accordingly with the right gear to stay comfortable.
Tips for Hiking The Narrows: Gear, Safety, and Best Practices
- Start early to avoid heat and crowds (first shuttle is at 7 am)
- Check water levels and flash flood warnings
- Use hiking poles for river sections
- Wear neoprene socks or waterproof shoes
- Know your turnaround point
- Mind the time to avoid missing the last shuttle back out of the canyon
Travel Insurance
Before any trip, I always recommend sorting out your travel insurance. World Nomads offers both single-trip and annual worldwide coverage, and you can get a free quote in just a few minutes to see what it would cost for your trip.
👉 Get Your Free QuoteWhat You Need to Hike The Narrows + Gear Rentals in Zion
First things first, you’ll need an America the Beautiful Pass to enter Zion. If you plan on visiting more than one national park in a year, it’s usually the most economical option. I always think of it as a little nudge to explore more public lands while you have it. Once you have the pass, it opens the door to hundreds of national parks, monuments, and recreation areas across the U.S., which makes it well worth it.
America the Beautiful Pass
America the Beautiful Pass Unlock a year of unforgettable adventures with the America the Beautiful Pass, your all-access ticket to over 2,000 federal recreation sites across the United States. From iconic National Parks to hidden gems managed by the U.S.…
I did the hike at the end of May (Memorial Day weekend). The air temperature was close to 100°F in the canyon that day, but the Virgin River’s water temperature was just 47°F!
If you’re wondering what gear you need for The Narrows, here’s a complete breakdown based on my experience and what most hikers use. You can rent shoes, poles, and neoprene socks at Zion Outfitter, or buy your own online if you plan to hike multiple rivers. Here are some top options:
Waterproof Gear for Hiking
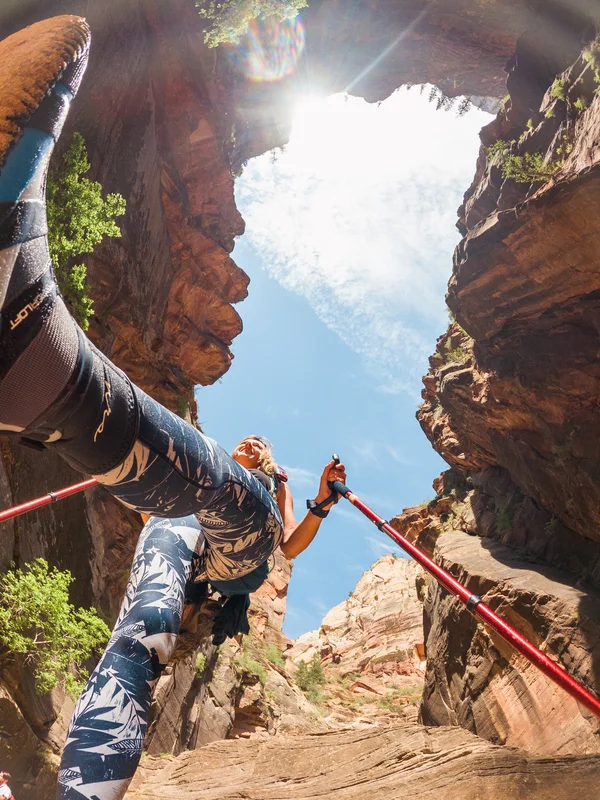
I wore my wetsuit bottoms and paddle shoes that I usually wear for stand-up paddleboarding, and I was very comfortable. The exact pants I wore are no longer available, but these are Amazon’s best-selling wetsuit pants. Many people wore shorts, but I overheard several people complain that the water was chilly. At the same time though, I am sure it was also refreshing given the air temperature.
Some families got to the trailhead only to realize that they were not equipped for the hike!! Make sure you get there prepared!
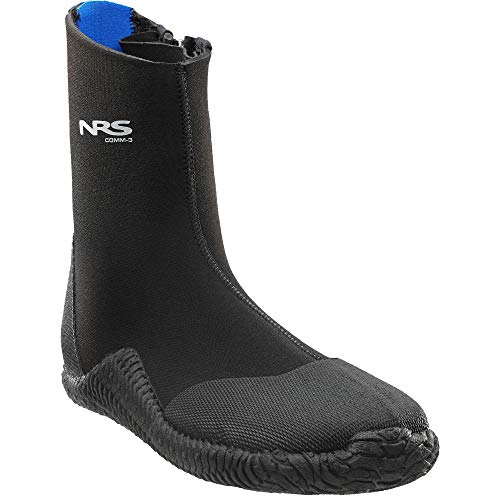
- Shoes: river-ready hiking shoes or trail runners with neoprene socks, canyoneering shoes, water shoes, or paddle shoes
- Neoprene socks: essential for cold water
- Hiking poles: help with balance in the river
- Dry bag: keep electronics and clothes dry
- Optional: wetsuit pants in winter, small backpack for snacks
- Rental options: shoes, socks, poles, and wetsuit pants can be rented at Zion Outfitter


Hiking Poles for River Trails
I was glad I had both my hiking poles with me. They helped me feel more stable in the water, and I think they also helped me go further on the hike. Had I only taken a single wooden stick with me, I probably would have turned around earlier than I did.
Dry Bag
I had a dry bag with me to keep electronics, food, and a change of clothes dry. I stored it inside my regular backpack, but you could also buy or rent a dry bag that is a whole backpack.


Zion Narrows Rentals: Shoes, Neoprene Socks & Gear
Renting gear for The Narrows is extremely common, and Zion Outfitter (in Springdale) is the closest and easiest place to rent shoes, neoprene socks, and hiking poles.
The store is located just outside the pedestrian park entrance and near the visitor center, where you take the shuttle to the trailhead.
So plan ahead, and get your gear before you take the shuttle to the trailhead!
Most people I saw had rented waterproof shoes, neoprene socks, and a tall wooden stick. You can also rent a waterproof bag.
Planning on backpacking soon? Read this blog post about investing in backpacking gear.
The Narrows Hiking Options
There are three main ways to hike The Narrows:
1. Bottom-Up Hike: The Bottom-Up Hike starts at Zion National Park’s Temple of Sinawava. This out-and-back route follows the Virgin River upstream. Importantly, this hike does not require a wilderness permit, making it the most popular option for day hikers.
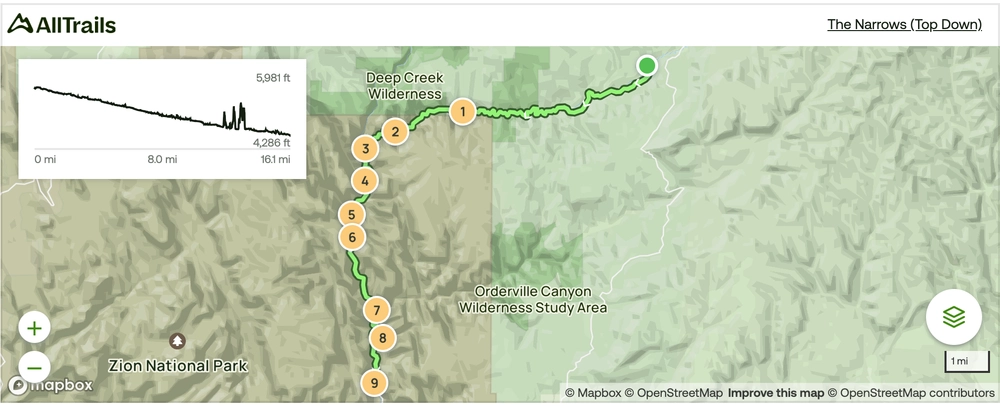
2. Top-Down Hike: The Top-Down Hike is a challenging 16-mile through-hike beginning at Chamberlain’s Ranch and ending at the Temple of Sinawava. For this route, a wilderness permit is required, and you will also need your own transportation to reach the trailhead. Although I haven’t experienced this option yet, I will update this guide once I do.
3. Guided Narrows Tour (Private Guide): If you want a safer, stress-free experience, or you’re just not comfortable hiking in a river on your own, a guided option is an awesome alternative. This 7-hour private Narrows tour with GoWithGuide includes expert navigation, geology and wildlife insights, pacing support, and full customization based on your comfort level. It’s ideal for families, beginners, or anyone who doesn’t want to deal with shuttle timing, gear decisions, or river conditions solo.
Zion Narrows Top-Down Map (Chamberlain’s Ranch Route)
This map shows the Top-Down route from Chamberlain’s Ranch. Use this Zion Narrows map to plan your hike.
The Bottom-Up Hike of The Narrows (no permit required!)
IMPORTANT! Before you head to the shuttle, make sure you have all the equipment you need with you! You can either buy your own ahead of time, or you can rent it out. All the equipment details are included below.
Hiking the Narrows is easy as 1, 2, 3!
1: Zion National Park Shuttle
I slept at the Watchman campground the night before, which really was a great location because I could walk to the visitor center’s shuttle bus station (#1).
From there, I took the shuttle bus to the Temple of Sinawava (#9), the last stop on the shuttle route, which takes about 45 mins to get to.
The shuttle schedule differs depending on the time of the year you visit the park, so be sure to check the schedule on the park’s website.
2: Riverside Walk Trail (no permit required!)
Once you arrive at the Temple of Sinawava, the trailhead is well-marked.
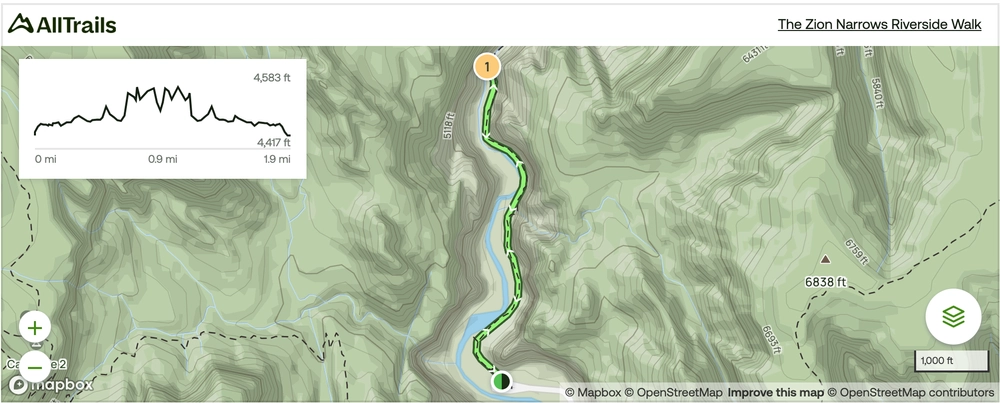
You first hike about a mile on a paved trail named the Riverside Walk, along the Virgin River. This is a pretty scenic walk in itself, and well worth the visit even if you don’t want to hike in the water.
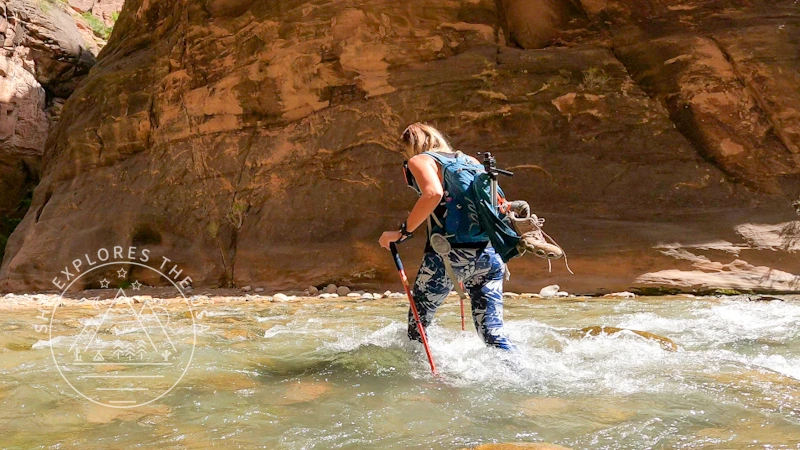
But after a mile, the paved path ends, and the Virgin River becomes the trail. And for me, that’s when the real fun starts!
The Narrows Riverside Walk Trail Map
🥾 Plan Smarter Hikes with AllTrails
AllTrails is my go-to for trip planning, from checking trail reviews to downloading maps, navigating from my phone, and sending routes straight to my Garmin 67i. Offline maps, alerts, and AI route planning make upgrading to Plus & Peak worth it!
3: The Narrows!
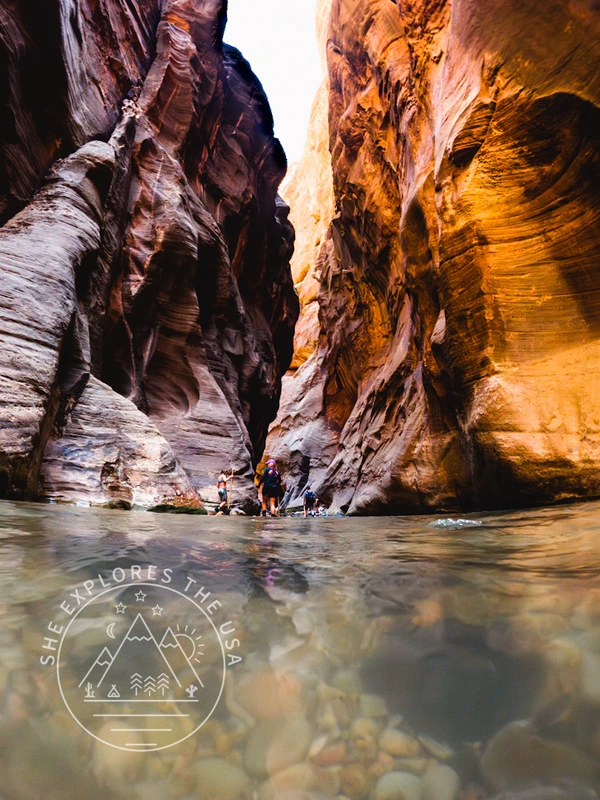
You can hike out all the way to Big Spring, which would make your hike a ten-mile round trip. But you can also hike in the river for a short while and turn around whenever you like. Doing the bottom-up hike allows you to see some of the most spectacular and narrowest parts of the canyon.
After a while, the river splits into two. Taking the left fork will allow you to stay on the way to Big Spring. There will be another fork shortly after, and you’ll have to take the right path there to stay on the North Fork.
Personally, I really enjoyed the river hike. Sometimes the water was only ankle-deep, other times waist-deep. I would recommend coming prepared, being aware of your comfort levels, and also paying attention to your energy levels. Walking in the river is quite tiring. Make sure you turn around before you get tired.
Best Guided Narrows Tours in Zion National Park
Hiking The Narrows is one of the most unforgettable experiences in Zion National Park, but it’s also very different from a typical trail. Instead of a marked path, you’re walking directly in the Virgin River, navigating slippery rocks, changing water levels, and a narrow canyon that can feel both incredible and slightly intimidating if it’s your first time.
If you’d rather not manage logistics like gear, shuttle timing, or river navigation on your own, a guided Narrows hike can be a great alternative. With a private guide, you get local knowledge, safety support, and a more relaxed way to experience the canyon.
Below are two private guided Narrows tours that offer very different but equally strong experiences.
GoWithGuide vs Viator: Private Narrows Tours Compared
| Feature | GoWithGuide Private Tour | Viator Private Guided Hike |
|---|---|---|
| Tour style | Private | Private |
| Duration | ~6 hours | ~7 hours |
| Group size | Up to 10 people | Private group only |
| Guide experience | 30+ years guiding Zion & Bryce (William Kim W.) | Professional local guide |
| Start time | 7:00 AM | 7:00 AM |
| Route | Riverside Walk + Virgin River hike (customizable) | Riverside Walk + ~2 miles upstream toward Orderville Canyon |
| Gear included | Not specified (guidance provided) | Trekking poles, canyoning boots, neoprene socks, waterproof backpack, seasonal bib waders |
| Food included | Hiking snacks | Snacks + bottled water + charcuterie picnic lunch |
| Pickup | St. George, Hurricane, Springdale | Meet in Springdale |
| Best for | Flexible, customizable guided experience with a long-time Zion expert | Fully supported hike with included gear and lunch |
Option 1: GoWithGuide Private Narrows Tour
This private guided hike is led by William Kim W., a Utah-based guide with more than 30 years of experience in Zion and Bryce Canyon National Parks. The experience is fully private, meaning it’s just your group with no strangers.
The itinerary is flexible and can be adjusted based on your pace and comfort level, but the general route follows a mix of dry canyon hiking and river walking in The Narrows.
What the Experience Looks Like
The tour begins at 7:00 AM at the Zion National Park Visitor Center in Springdale. From there, your group takes the mandatory park shuttle to the Temple of Sinawava, the starting point for The Narrows.
You’ll first follow the Riverside Walk, a flat and shaded trail along the Virgin River. After about 1.6 km, the terrain changes as you enter the water and begin hiking directly through the canyon.
From here, the route continues upstream in the Virgin River for approximately 2 to 3 km, although the exact distance can be adjusted based on your group’s preference and conditions on the day. The canyon walls rise dramatically on both sides, with towering sandstone cliffs reaching up to 400 meters.
At a chosen turnaround point, you’ll head back along the same route, returning through the river section before finishing the Riverside Walk back to the shuttle stop. The tour concludes around midday.
What’s Included
- Private guided experience (no other groups)
- Expert guidance on Zion’s geology, plants, and wildlife
- Hiking snacks
- Logistical support throughout the day
- Pickup available from St. George, Hurricane, and Springdale
- Flexible itinerary based on your group’s needs
Who This Tour Is Best For
This guided hike is a strong option if you:
- Want a private, customizable experience
- Prefer a guide with deep local knowledge of Zion
- Don’t necessarily need all gear included in advance
- Want flexibility in how far you hike into the canyon
Option 2: The Narrows: Zion National Park Private Guided Hike (Viator)
This private guided hike offers a fully supported way to experience The Narrows, with most of the essential river hiking gear included in the booking.
Your guide leads you from Springdale into Zion National Park, starting with the Riverside Walk before entering the Virgin River. From there, you’ll hike approximately 2 miles upstream toward Orderville Canyon, depending on conditions and group comfort.
Along the way, your guide shares insights about the canyon’s geology, ecosystem, plants, and wildlife while you move through one of the most iconic slot canyons in the United States.
At the end of the hike, the experience finishes with a charcuterie picnic lunch at Zion Lodge before returning to the meeting point in Springdale.
What’s Included
- Private guided hike (your group only)
- Trekking poles
- Canyon hiking boots
- Neoprene socks
- Waterproof backpack (1 per booking)
- Seasonal bib waders (October–May)
- Bottled water
- Snacks
- Charcuterie picnic lunch (vegetarian, vegan, and gluten-free available on request)
What to Expect
The tour starts at 7:00 AM in Springdale near the pedestrian bridge into Zion National Park. After meeting your guide, you’ll travel to the Temple of Sinawava and begin the hike along the Riverside Walk.
Once in the river, you’ll continue upstream through The Narrows, walking over submerged rocks and through shallow flowing water. After reaching the turnaround point near Orderville Canyon, you’ll return the same way back to the trailhead.
The full experience lasts approximately 7 hours.
Who This Tour Is Best For
This guided hike is a good fit if you:
- Want most gear and logistics handled for you
- Prefer a fully organized day from start to finish
- Are visiting Zion for the first time
- Want a mix of hiking, education, and a picnic experience
With hundreds of 5-star reviews and a strong traveler recommendation rate, it’s a popular choice for visitors wanting a more structured guided experience.
FAQ about Hiking the Narrows in Zion
Do you need a permit to hike The Narrows?
For the popular Bottom-Up hike starting at the Temple of Sinawava, no wilderness permit is required. However, if you plan to do the Top-Down through-hike (16 miles from Chamberlain’s Ranch), a wilderness permit is mandatory.
When is the best time to hike The Narrows in Zion National Park?
The best time is late spring through early fall, when water levels are lower and temperatures are warmer. Winter and early spring can be cold with high water levels, and the trail may be closed due to safety concerns.
Is The Narrows hike open year-round?
The Narrows is generally open year-round, but seasonal weather conditions, water levels, and flash flood risks may cause temporary closures. Always check current park conditions before your hike.
What gear do I need for hiking The Narrows?
Essential gear for hiking The Narrows includes waterproof hiking shoes or water shoes, as well as hiking poles for stability. Additionally, bring a dry bag to keep your belongings dry, and if you’re hiking in colder water, consider neoprene socks or wetsuit pants. If you don’t have your own gear, you can rent everything you need at Zion Outfitters in Springdale.
How long is the Narrows hike?
The Bottom-Up hike can be as short or long as you want. The full hike to Big Spring and back is about 10 miles. The Top-Down through-hike is a strenuous 16-mile one-way trek requiring a permit.
Are there shuttle services to the Narrows trailhead?
Yes, Zion National Park operates a shuttle service that stops at the Temple of Sinawava, the starting point for the Bottom-Up hike. Shuttle schedules vary seasonally, so check the park’s website for the latest info.
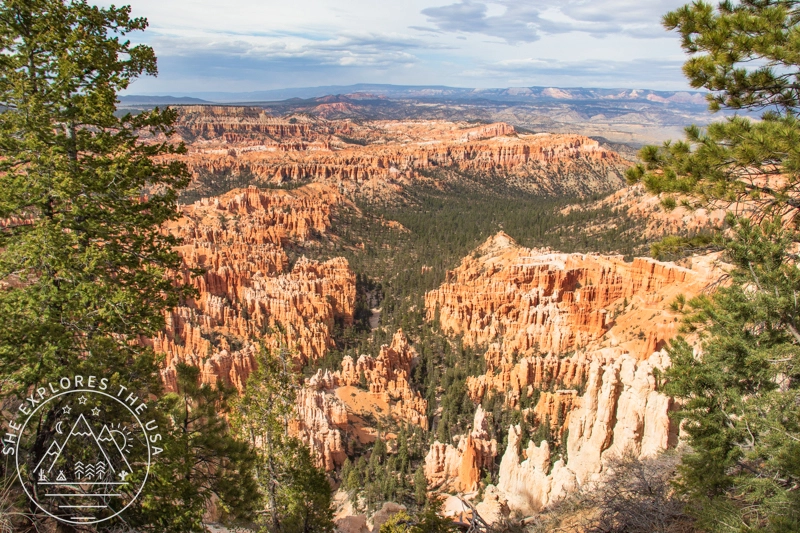
How to plan a first visit to Bryce Canyon National Park
Bryce Canyon National Park is absolutely gorgeous! The hoodoos don’t even look real at first; it feels like you’re standing[…]…
Final Thoughts on Hiking The Narrows in Zion
Hiking The Narrows is one of those rare experiences that truly lives up to the hype. Walking through the Virgin River with towering canyon walls rising on both sides feels surreal, humbling, and unforgettable in a way that’s hard to fully capture until you’re there. Whether you choose a shorter bottom-up hike, push deeper into the canyon, or join one of the private guided Narrows tours for extra support and local insight, there’s an option that fits different comfort levels and travel styles. With a bit of planning, the right gear, and respect for river conditions, this can easily become the highlight of your time in Zion, just like it was for mine.

Post originally published on June 11, 2022, and last updated on July 5, 2026.